


The Science of Pre-Soaking Seeds
Every gardener knows the agonizing wait between sowing seeds and seeing that first burst of green push through the soil. While some seeds germinate with ease, others can be notoriously stubborn. One of the most effective, low-tech ways to tip the scales in your favor is the practice of seed soaking. By hydrating your seeds before they ever touch the earth, you are essentially jump-starting the biological process of germination.
Why Soaking Works
Inside every seed lies a dormant embryo wrapped in a protective, often hard, seed coat. In nature, seeds rely on moisture and time to soften this coat, signaling to the embryo that conditions are right for growth. When you soak seeds, you provide the necessary moisture to penetrate that barrier, initiating the metabolic activity required to break dormancy. This process, often called ‘priming,’ allows the seed to bypass the initial stages of water absorption once planted, leading to faster, more uniform emergence across your seedbeds.
The Critical Balance: Knowing When to Soak
Not every seed benefits from a bath. Large, hard-coated seeds are the primary candidates for soaking, as they have the structural integrity to handle increased moisture without rotting. Conversely, tiny, fragile seeds—such as lettuce or poppy—are best sown directly into the soil where their moisture needs are managed by the surrounding medium. If you over-soak delicate seeds, you risk inducing rot before they even have a chance to sprout.
A Gardener’s Guide to Soaking Times
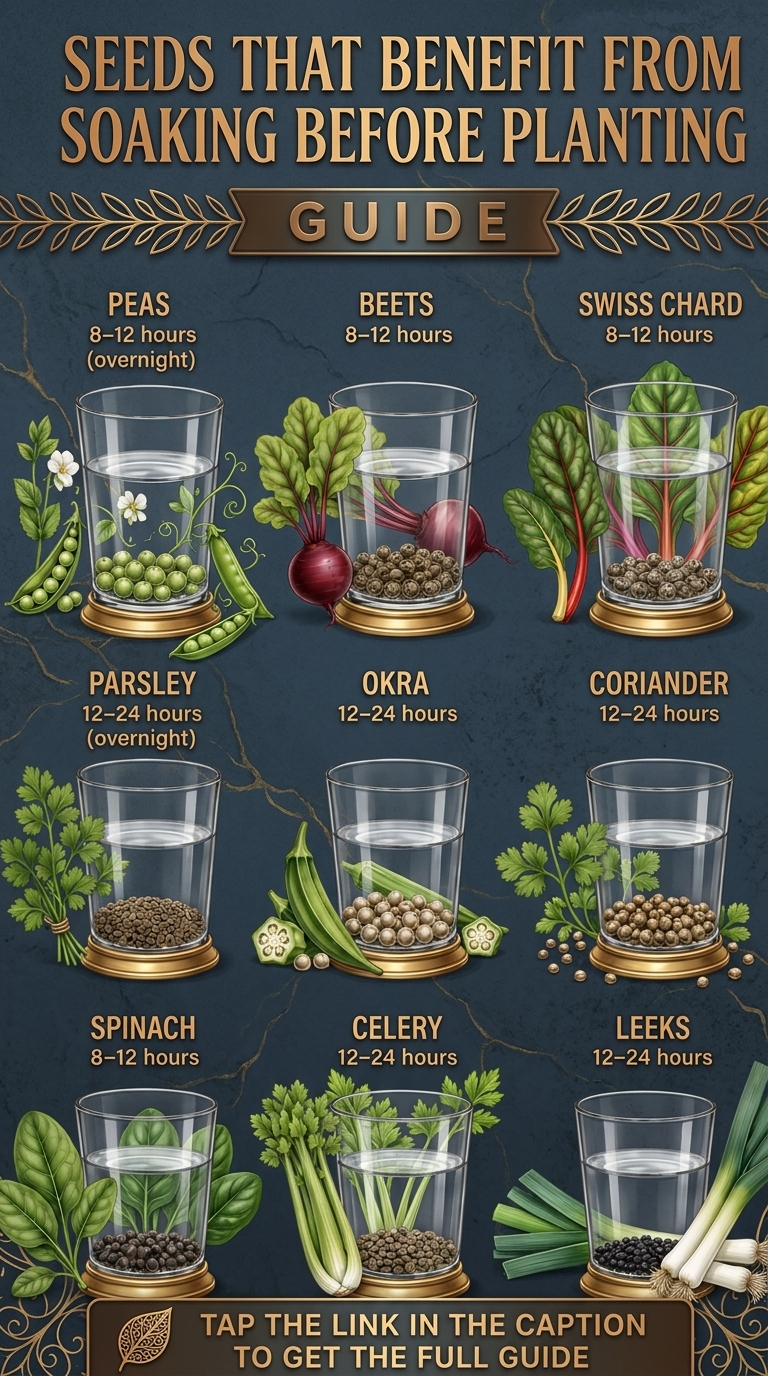
Precision is key when it comes to hydration. Soaking for too long can deprive the seed of oxygen, potentially suffocating it. Use this general guide to manage your timing:
- Short-Soak Seeds (8 to 12 hours): This category includes larger, starchier seeds like peas, beans, beets, and Swiss chard. These seeds have robust coats that benefit from a relatively quick hydration window to soften their exterior.
- Long-Soak Seeds (12 to 24 hours): Seeds with particularly thick or woody coats, such as parsley, celery, and chives, require more time to allow water to migrate to the embryo.
How to Properly Soak Your Seeds
The process is remarkably simple, but using the right approach ensures success. Always use clean, room-temperature water. Avoid using hot water, which can damage the delicate cellular structure of the embryo, or ice-cold water, which may send the seed back into a state of shock. Simply place your seeds in a shallow bowl or a small glass jar and cover them with enough water to ensure they are fully submerged. Place the container in a warm, dark spot in your home.
Once your soaking time has elapsed, the seeds should be planted immediately. Do not let them dry out after soaking, as this can interrupt the germination process and lead to inconsistent results. If you cannot plant them right away, drain the water thoroughly and keep them in a damp paper towel in a cool place, but try to limit the delay to a few hours at most.
Practical Tips for Success
To get the most out of your pre-soaking routine, keep these expert tips in mind:
- Don’t over-crowd: Ensure the seeds have plenty of room in the container so they are not competing for water or oxygen.
- The Float Test: As a general rule, seeds that float after soaking may be non-viable. While this isn’t a perfect indicator, it can help you weed out seeds that are unlikely to germinate.
- Sowing after soaking: Because pre-soaked seeds are already hydrated, the soil you plant them in must be consistently moist. If you plant a hydrated seed into dry soil, the soil will act like a sponge and pull the moisture back out of the seed, causing it to dehydrate and fail. Always water your seedbed immediately after sowing.
- Labeling: If you are soaking multiple varieties, make sure to label your containers. It is surprisingly easy to lose track of which seeds are which once they have swollen and changed texture.
By incorporating seed soaking into your early-season routine, you aren’t just planting seeds—you’re managing the environment to give your garden the strongest possible start. It is a simple, meditative practice that pays dividends in the form of a more productive and reliable harvest.