


Orchids are often misunderstood, gaining a reputation as temperamental plants that are impossible to keep alive. In reality, most orchid failures come down to one single, fatal error: overwatering. Unlike common houseplants that thrive in moist potting soil, orchids are primarily epiphytes—plants that grow on trees in the wild, absorbing moisture from the air and rain through their exposed root systems. If you treat an orchid like a fern, you are likely setting it up for root rot.
The Silver-Gray Indicator
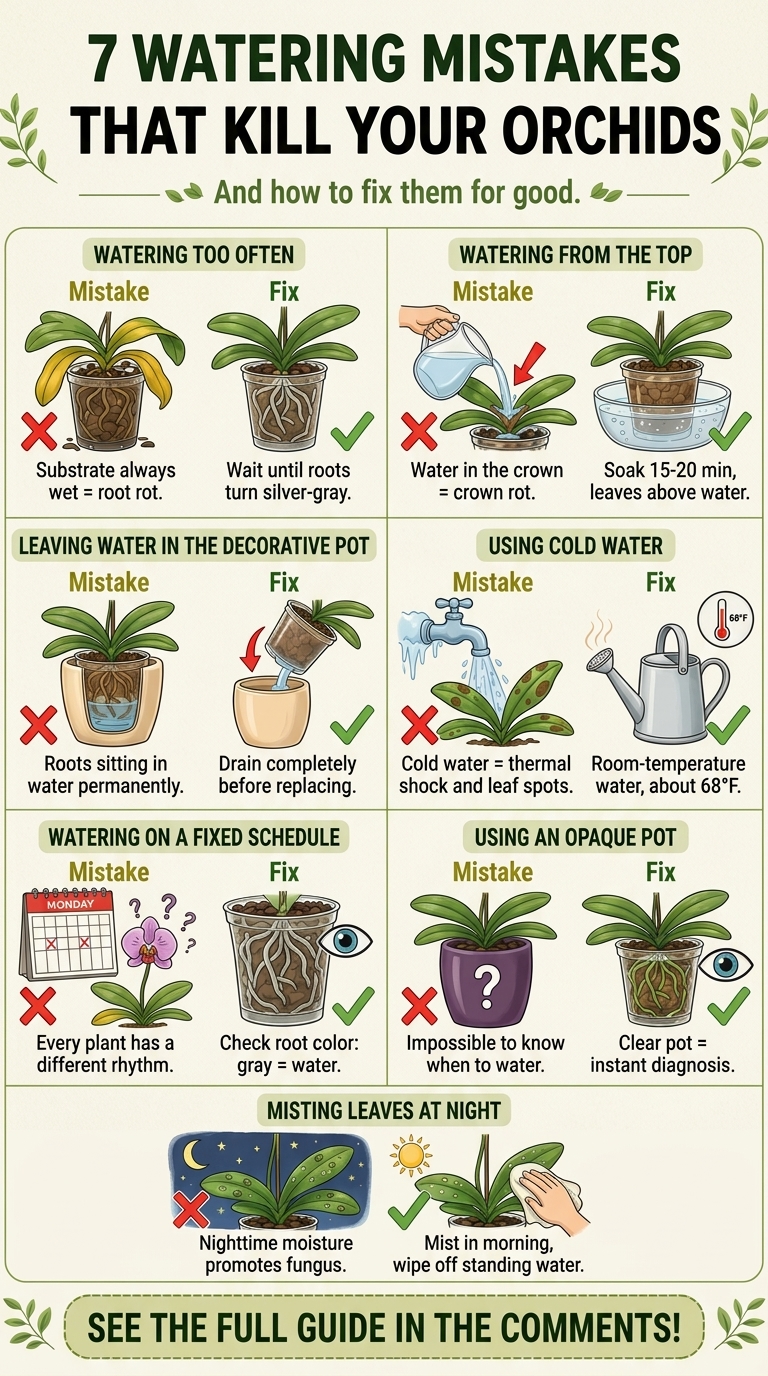
The most reliable way to determine if your orchid needs water is not by following a strict weekly calendar, but by observing the color of its roots. Healthy orchid roots are generally green when hydrated, as they contain chlorophyll for photosynthesis. As they dry out, they transition into a distinct silver-gray color.
If you keep your orchid in a clear plastic pot—which is highly recommended for beginners—you have a window into the plant’s health. When the roots look vibrant green, the plant is fully hydrated. When they turn that signature silver-gray, it is a signal that the orchid is ready for its next drink. Waiting for this color shift prevents you from saturating the medium while the plant is still effectively ‘full.’
The Soak Method: Why Top-Watering Fails
Many gardeners make the mistake of watering their orchids from the top, splashing water over the leaves or letting it trickle through the bark. This method is ineffective for several reasons. First, top-watering often leaves pockets of dry bark, meaning the roots aren’t getting uniform moisture. Second, if water collects in the crown of the orchid—the center where the leaves emerge—it can lead to crown rot, which is often fatal.
Instead, use the soak method. Place the orchid’s plastic liner pot into a bowl or basin filled with room-temperature water. Allow it to sit for ten to fifteen minutes. The potting medium (usually a mix of bark, perlite, and charcoal) will absorb the moisture it needs, and the roots will drink their fill. This ensures deep, consistent hydration without the risk of water pooling in the foliage.
Drainage Is Non-Negotiable
Orchids detest ‘wet feet.’ After your soak, let the plant drain thoroughly. If you use decorative outer pots to hide the ugly plastic nursery containers, make sure you empty them after every watering session. Never allow an orchid to sit in standing water. If the roots remain submerged, they will be deprived of oxygen and begin to decay within days. A mushy, brown, or foul-smelling root system is a sign that the plant has been sitting in stagnant water for too long.
Best Practices for Success
- Temperature Matters: Always use room-temperature water. Water that is too cold can shock the tropical roots, causing them to stall in growth or drop buds prematurely.
- Timing Is Everything: The best time to water is in the morning. This allows the orchid to absorb the moisture it needs during the daylight hours when it is photosynthesizing, and it ensures that any accidental droplets on the leaves have time to evaporate before the cooler evening temperatures set in.
- Quality Water: If possible, use rainwater or distilled water. Orchids are sensitive to the high mineral content, salts, and chlorine found in hard tap water, which can build up in the potting medium and ‘burn’ the roots over time.
- Evaluate the Medium: Orchid bark breaks down over time, eventually becoming a fine, soil-like compost that holds too much water. If your bark feels soggy or looks like potting soil, it is time to repot your orchid into fresh, chunky substrate to ensure proper airflow around the roots.
By shifting your focus from a rigid schedule to the visual cues provided by the roots, you move from guessing to truly understanding your plant. Embrace the silver-gray transition, master the soak, and your orchids will reward you with stronger growth and healthier, more frequent blooms.