


Every gardener knows the agonizing wait between tucking a seed into the soil and seeing that first hopeful flash of green emerge. While nature follows its own rhythm, you can often give your garden a strategic head start by employing a simple, time-tested technique: seed soaking. By mimicking the natural process of moisture absorption that occurs in the wild, you can effectively bypass dormancy and jump-start the germination process.
The Science Behind the Soak
At its core, a seed is a dormant powerhouse waiting for the right environmental cues to wake up. Most seeds remain in this suspended state because of their hard, protective outer shells, known as the seed coat. This coat is designed to prevent premature germination during a dry spell. Soaking seeds acts as a trigger, signaling to the embryo that moisture is plentiful and the conditions are finally right for growth.
When you soak a seed, water permeates the seed coat and hydrates the interior tissues. This rehydration activates enzymes that begin breaking down stored starches into sugars, providing the energy the seedling needs to push its radicle—the first root—through the soil. Essentially, you are doing the heavy lifting for the seed, allowing it to spend its limited energy on upward growth rather than struggling to hydrate through dry, packed soil.
Which Seeds Benefit Most?
Not every seed requires a pre-soak, and some can even be damaged by it. Generally, larger, hard-shelled seeds are the best candidates. Smaller, delicate, or coated seeds (often found in pelletized commercial varieties) should be sown dry to avoid rotting. The primary candidates for soaking include legumes and large grains:
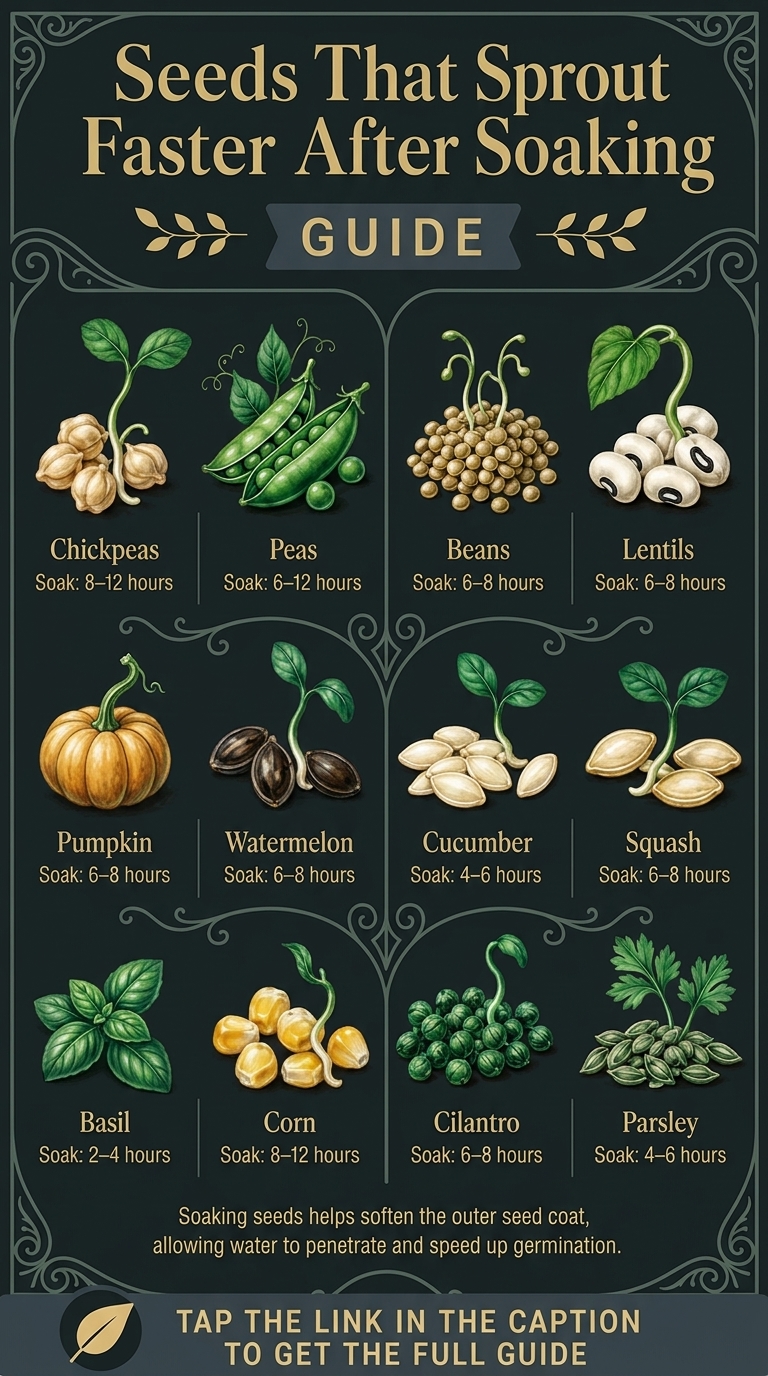
- Beans: These benefit significantly from an 8 to 12-hour soak, which softens the skin enough to allow the sprout to emerge quickly.
- Corn: Like beans, corn seeds possess a tough outer layer that is easily softened by an 8 to 12-hour soak in room-temperature water.
- Peas, Lentils, and Chickpeas: These smaller legumes require a slightly shorter duration of 6 to 8 hours to reach optimal hydration without becoming waterlogged.
How to Properly Soak Your Seeds
The process is straightforward, but technique matters. To ensure success, follow these steps:
- Use Room Temperature Water: Avoid using water that is freezing cold or boiling hot. Room temperature water is gentlest on the biological processes within the seed.
- Clean Containers: Always use a clean bowl or glass. Stagnant water can harbor bacteria or mold, which may compromise your seeds before they even hit the dirt.
- Timing is Everything: Do not exceed the recommended soak times. If seeds sit in water for too long—usually beyond 24 hours—they can suffocate or begin to rot.
- Drain and Dry: After the soak is complete, drain the water thoroughly. If you cannot plant them immediately, pat them dry with a clean paper towel to prevent mold growth.
Practical Tips for Success
While soaking is an effective tool, it is not a magic fix for poor soil conditions. Here are a few ways to maximize your results:
First, always ensure your planting bed is ready before you begin the soaking process. Because soaked seeds have already begun the metabolic process of germination, they are eager to grow and should be placed in warm, moist soil immediately after their bath. If they dry out after being soaked but before being planted, the embryo can be damaged.
Second, consider adding a tiny splash of liquid seaweed or a diluted compost tea to your soak. These organic amendments can provide a subtle nutrient boost, though plain water is perfectly sufficient for the vast majority of garden crops. Avoid adding chemical fertilizers or concentrated salts, as these can dehydrate the seed through osmosis and inhibit growth.
Lastly, keep a log of your successes. Different heirloom varieties may have varying thicknesses of seed coats. By noting which varieties responded best to your specific soak times, you can refine your process year after year, eventually developing a personalized system that ensures your garden gets off to the strongest possible start each season.